
|
 |  |  |  |  |  |
 |
| |||||||
|
Welcome to Mazdaspeed Forums . You are currently viewing our boards as a guest which gives you limited access to view most discussions and access our other features. By joining our free community you will have access to post topics, communicate privately with other members (PM), respond to polls, upload content and access many other special features. Registration is fast, simple and absolutely free so please, join our community today! If you have any problems with the registration process or your account login, please contact contact us. *When you join MSF as a registered user, there will be No Ads. *Registered Members get access to the Off Topic Area of the Forum *Registered Members have an opportunity to upgrade their accounts to VIP, which brings a host of goddies for supporting MSF such as Raffles, Additional Forum Access, More PM Storage, The ability to upload more Images and many other enhancements. *Registered members also get access to the live chat box! |
 10Likes
  |
| | | LinkBack | Thread Tools | Search this Thread | Display Modes |
 |  01-02-2014, 08:15 AM
| #1 |  |
| Approved MSF Vendor  Join Date: Dec 2008 Location: Draper, UTAH
Posts: 1,452
(View Stats)
iTrader: (6)
Rep Power: 637   Thanks: 435
Thanked 965 Times in 382 Posts
Groans: 0
Groaned at 3 Times in 3 Posts
(Thread Starter) |   Neutral : +4 score Neutral : +4 score  JBR - James Barone Racing Passenger Side Motor Mount (80A Duro.) For more information on JBR products for your car, click here, or any of the images below! JBR Passenger Side Motor Mount (80A Duro.) Mazdaspeed3 2007-2013 Part #: JBR MZ3MS3PMM80 Brand: James Barone Racing Return Policy: Standard Return Policy Mfgr. Warranty: Limited Lifetime WarranDescription Color: Black Durometer: 80A Material: T6-6061 Aluminum The JBR Passenger Mount is the only Vertically Oriented mount on the market. This mount can and will handle all the abuse you plan to throw at it. From street to strip its the only true 1 piece Passenger mount for the 07-13 MAZDASPEED 3. Theyve replaced the weak cast aluminum factory support which has been prone to cracking with a steel support. The actual mount itself is CNC milled from a solid 3 pound block of T6-6061 grade aluminum.Custom, Proven Poly Urethane bushings in your choice of 70 or 80 Durometer allow you to choose the amount of stiffness you want to run without sacrificing comfort. First things first, we need some tools. Heres a list of all the tools you will need to perform this installation: 1) Jack, Jack Stands, Ramps or Lift 2) Ratchet Wrench 3) Torque Wrench 4) 17mm Socket 5) 10mm Socket 6) 11mm Socket 7) 11mm Wrench 8) Flat Head Screw Driver To begin, if you don't have access to a lift ensure you park on a flat leve surface with the e-brake engaged and toss some wheel chocks behind the rear tires. Remove the under tray so that you can support the motor with your floor jack before removing the motor mount. **You do not want to apply a ton of force with the floor jack or you will break something. It is simply going to be used to take the load while you pull the motor mount and put the new one in**     Remove the coolant and power steering reservoirs by inserting a flat head screw driver in to the tabs and pulling up. *NOTE* The reservoirs can be pivoted by their hoses towards the front of the vehicle.      Remove 1 x 10mm bolt for the ground strap, 2 x 17mm nuts and 2 x 17mm bolts from the mount and remove the mount from the car.     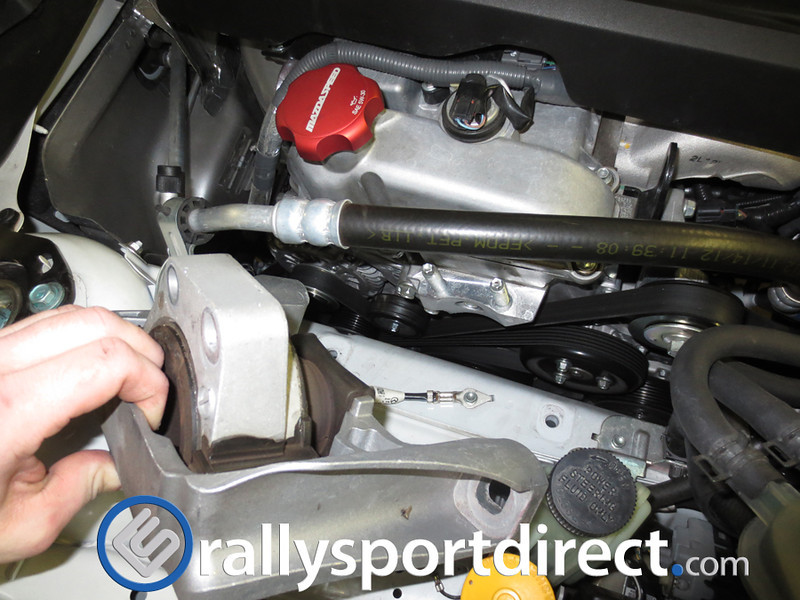 Remove 1 x 10mm bolt and remove the ground strap.  Bend the end of the ground strap previously bolted to the mount on a 45* angle.  Flatten the tab on the end of the ground strap previously bolted to the chassis.  Remove the 8mm timing cover bolt located towards the rear of the vehicle above the alternator. Attach the end of the ground strap previously attached to the factory mount that you bent on a 45* degree angle in the step above and tighten. Attach the other end of the ground strap using the 10mm bolt removed in step 6 to the rear most pre-existing hole in the sub-frame located in front of the alternator.     Place your new JBR Passenger Motor Mount in place and tighten to the proper torque: 60ft/lbs.   Next install the two 17mm bolts but do not torque them down yet. Ensure there is approximately a 3/16 gap between the chassis and the back of the motor mount. A flat head screw driver may be used to move the mount in to place while tightening. Never attempt to loosen the bushing bolt, doing so will void the warranty on the mount. Torque the 17mm bolts down to the proper torque: 70ft/lbs. 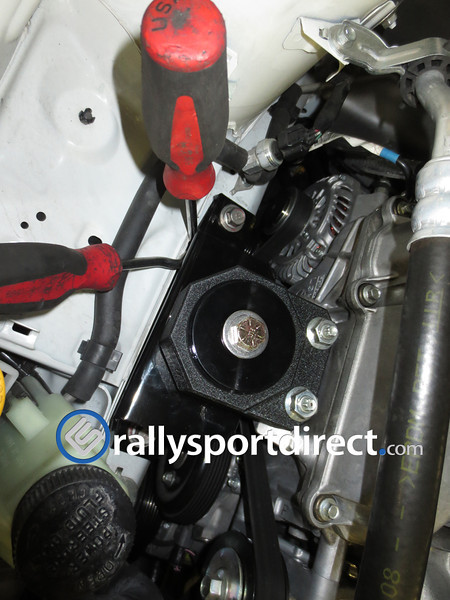  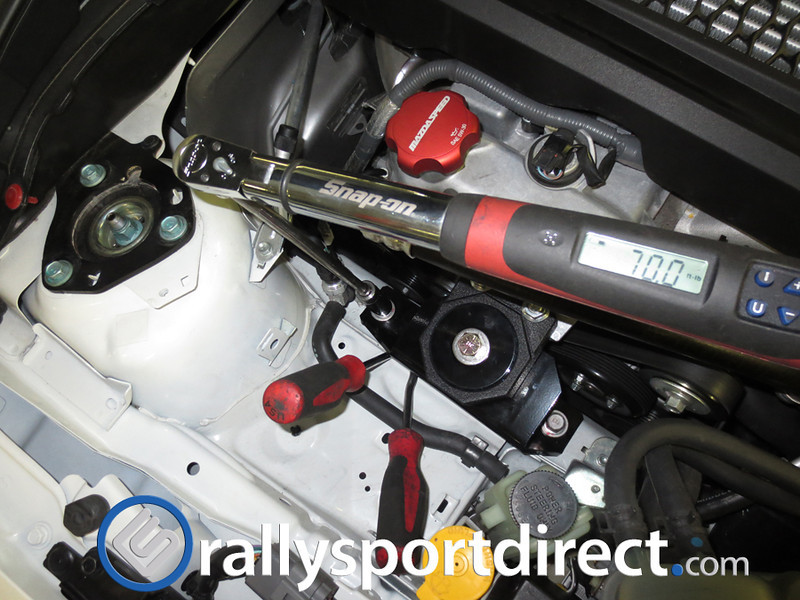 Reinstall the coolant and power steering reservoirs and you are all done!  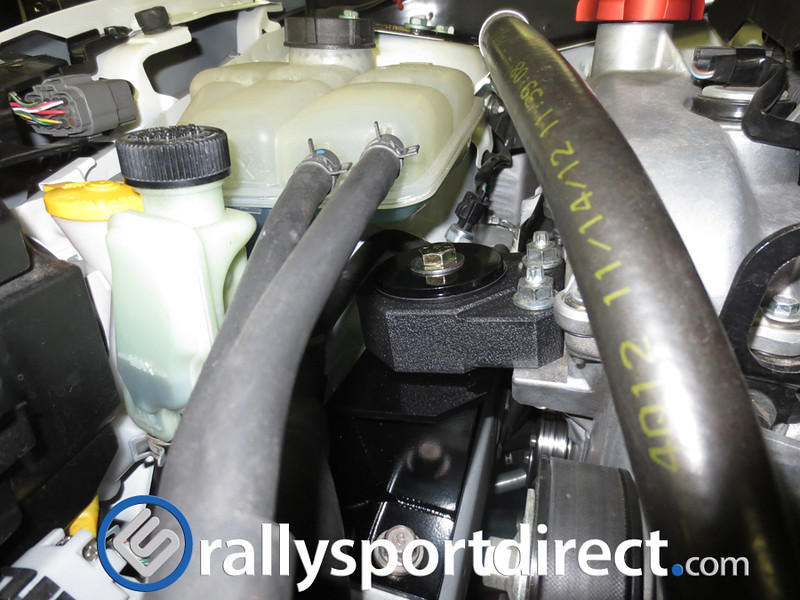 For anyone that has been interested in upgrading their passenger side motor mount, this install was very easy and the results are amazing. I highly suggest this upgrade from JBR, his mounts are top quality. The 80A that we went with does transfer a bit of noise and vibration into the cabin which is to be expected but with any aftermarket part you always have to sacrifice some comfort to get the performance. Engine pitch is reduced significantly resulting in much easier shifting and greatly increased throttle response. Thanks, Tanner For more information click here:
__________________  |

|  |
| The Following 13 Users Say Thank You to RallySportDirect For This Useful Post: | ABOSWORTH (06-17-2014), Andrewbox (01-02-2014), AshFromCan (08-18-2014), Chief_Wiggum (01-02-2014), ckMS3 (01-02-2014), donjohnk (01-08-2014), JPele21 (01-02-2014), liljae8 (09-19-2015), mize13 (01-02-2014), motoman (06-18-2014), Shampu (01-14-2014), someguy (01-02-2014), trancehead (01-02-2014) |
|
01-02-2014, 08:21 AM
| #2 | |
 Join Date: Nov 2012 Location: Gaithersburg, MD
Posts: 1,841
(View Stats)
iTrader: (18)
Rep Power: 0 Thanks: 5,191
Thanked 1,726 Times in 929 Posts
Groans: 25
Groaned at 3 Times in 2 Posts
| Not Ranked : 0 score This is pretty damn awesome. All your reviews and how to's are spot on RallySportDirect likes this.
__________________ 2012 CWP MS3 2014 SWP WRX 2014 SWP Mazda 3 |
|
| |
| The Following User Says Thank You to trancehead For This Useful Post: | RallySportDirect (01-02-2014) |
|
01-02-2014, 08:39 AM
| #3 | |
| Join Date: Sep 2011 Location: Canada
Posts: 914
(View Stats)
iTrader: (0)
Rep Power: 0 Thanks: 213
Thanked 556 Times in 300 Posts
Groans: 24
Groaned at 166 Times in 32 Posts
| Not Ranked : 0 score A couple notes from my experience: - Some cars do not have a ground strap that needs to be relocated. If that's the case, becomes much simpler. - Supporting the engine, throw a block of wood or hockey puck in the top of the jack so as to not deform your oil pan (helps spread out the weight from those nasty "teeth"). You can also get away with not removing the splash panel if you're lazy on some cars, it has enough flex that it can be moved (by hand even) to touch the oil pan...hence just another piece of plastic between the jack/oil pan. - The coolant tank is a PITA sometimes, takes a good bit of pulling to get it to come even with the tabs pushed back. - If the studs come out on the engine side (happens from time to time), have an E-Torx socket ready to put them back in. But as usual, great install guide. The PMM and TMM mounts are not that hard to do on these cars. RallySportDirect likes this.
__________________ - 2010 Mazdaspeed 3 Black Mica - - Cobb AP - Self Tuned - cpe HPFP - cpe DP - CS 3" SRI - cpe TMIC - Forge BPV v2 - Grimmspeed EBCS - Denso ITV22 - - SouthBend Stage 3 Daily Clutch - cpe RMM - CS TMM Insert - TWM SB - CS SSP & SW - CS RSB & Mid Chassis Brace - - CS Brake Pads - Michelin Pilot Super Sport - CS Boost Tubes - CS Fog, DRL and Interior LEDs - Horns - Grounds - 20% Tint - |
|
| |
| The Following User Says Thank You to someguy For This Useful Post: | RallySportDirect (01-02-2014) |
|
01-02-2014, 12:07 PM
| #4 | |
| Join Date: Jul 2011 Location: Oahu, HI
Posts: 125
(View Stats)
iTrader: (0)
Rep Power: 0 Thanks: 35
Thanked 45 Times in 26 Posts
Groans: 3
Groaned at 0 Times in 0 Posts
| Not Ranked : 0 score Thanks for taking all the time to write up the step-by-steps! very nice and often thankless. RallySportDirect likes this.
__________________ CS Rear Swaybar | CS Short Shift Plate | CS Shifter Bushings | CS RMM | CS Transmission Mount Insert | CS PMM | Forged Recirculate Valve | CS & JBR Silicone Hoses | Cobb AP | Koni FSDs | AutoTech HPFP Internals | CS TIP/SRI | CP-E TMIC | Hella SuperTones | CS Test Pipe | CS OCC | CS CF Hood Scoop | Stratified Flash Tune V2.10 - 2011 Black Mica Tech Package (15,500 miles) |
|
| |
| The Following User Says Thank You to JPele21 For This Useful Post: | RallySportDirect (01-02-2014) |
|
01-02-2014, 02:45 PM
| #5 | |
| Approved MSF Vendor Join Date: Dec 2008 Location: Draper, UTAH
Posts: 1,452
(View Stats)
iTrader: (6)
Rep Power: 637 Thanks: 435
Thanked 965 Times in 382 Posts
Groans: 0
Groaned at 3 Times in 3 Posts
(Thread Starter) | Not Ranked : 0 score

__________________ | |
|
| |
| The Following User Says Thank You to RallySportDirect For This Useful Post: | someguy (01-02-2014) |
|
01-02-2014, 03:32 PM
| #6 | |
| Join Date: Dec 2013
Posts: 159
(View Stats)
iTrader: (0)
Rep Power: 0 Thanks: 301
Thanked 29 Times in 24 Posts
Groans: 3
Groaned at 1 Time in 1 Post
| Not Ranked : 0 score I have fitted both and the instruction are so clear and i am a novice RallySportDirect likes this. |
|
| |
| The Following User Says Thank You to roguemazda For This Useful Post: | RallySportDirect (01-02-2014) |
|
01-08-2014, 07:47 PM
| #7 | |
| Join Date: Jul 2011 Location: Oahu, HI
Posts: 125
(View Stats)
iTrader: (0)
Rep Power: 0 Thanks: 35
Thanked 45 Times in 26 Posts
Groans: 3
Groaned at 0 Times in 0 Posts
| Not Ranked : 0 score The more I look at the mounts and this how-to, the more I want to install a set myself. RallySportDirect likes this.
__________________ CS Rear Swaybar | CS Short Shift Plate | CS Shifter Bushings | CS RMM | CS Transmission Mount Insert | CS PMM | Forged Recirculate Valve | CS & JBR Silicone Hoses | Cobb AP | Koni FSDs | AutoTech HPFP Internals | CS TIP/SRI | CP-E TMIC | Hella SuperTones | CS Test Pipe | CS OCC | CS CF Hood Scoop | Stratified Flash Tune V2.10 - 2011 Black Mica Tech Package (15,500 miles) |
|
| |
| The Following 2 Users Say Thank You to JPele21 For This Useful Post: | RallySportDirect (01-09-2014), rockshoxtora (08-05-2014) |
|
01-08-2014, 07:51 PM
| #8 | |
| Join Date: Sep 2011 Location: Canada
Posts: 914
(View Stats)
iTrader: (0)
Rep Power: 0 Thanks: 213
Thanked 556 Times in 300 Posts
Groans: 24
Groaned at 166 Times in 32 Posts
| Not Ranked : 0 score
__________________ - 2010 Mazdaspeed 3 Black Mica - - Cobb AP - Self Tuned - cpe HPFP - cpe DP - CS 3" SRI - cpe TMIC - Forge BPV v2 - Grimmspeed EBCS - Denso ITV22 - - SouthBend Stage 3 Daily Clutch - cpe RMM - CS TMM Insert - TWM SB - CS SSP & SW - CS RSB & Mid Chassis Brace - - CS Brake Pads - Michelin Pilot Super Sport - CS Boost Tubes - CS Fog, DRL and Interior LEDs - Horns - Grounds - 20% Tint - | |
|
| |
|
01-09-2014, 05:52 PM
| #9 | |
| Approved MSF Vendor Join Date: Dec 2008 Location: Draper, UTAH
Posts: 1,452
(View Stats)
iTrader: (6)
Rep Power: 637 Thanks: 435
Thanked 965 Times in 382 Posts
Groans: 0
Groaned at 3 Times in 3 Posts
(Thread Starter) | Not Ranked : 0 score
__________________ | ||
|
| |
| The Following User Says Thank You to RallySportDirect For This Useful Post: | someguy (01-09-2014) |
|
01-09-2014, 07:08 PM
| #10 | |
| Join Date: Jan 2012 Location: Colorado Springs CO
Posts: 51
(View Stats)
iTrader: (0)
Rep Power: 0 Thanks: 37
Thanked 56 Times in 23 Posts
Groans: 0
Groaned at 0 Times in 0 Posts
| Not Ranked : 0 score I just completed all 3 motor mounts by myself from start to end in total 2 1/2 hours following the how to very easy thanks Sent from my SAMSUNG-SM-N900A using Tapatalk RallySportDirect likes this.
__________________ Boom Slide Side   |
|
| |
| The Following User Says Thank You to CowboyMS3 For This Useful Post: | RallySportDirect (01-10-2014) |
|
01-11-2014, 05:37 PM
| #11 | |
| Join Date: Jul 2011 Location: Oahu, HI
Posts: 125
(View Stats)
iTrader: (0)
Rep Power: 0 Thanks: 35
Thanked 45 Times in 26 Posts
Groans: 3
Groaned at 0 Times in 0 Posts
| Not Ranked : 0 score Well, I have the RMM on and that made a world of difference. Now I just need to budget out some more money and get on and buy some of these things. The installs are easy, I'm sure of it....thanks for sharing. RallySportDirect likes this.
__________________ CS Rear Swaybar | CS Short Shift Plate | CS Shifter Bushings | CS RMM | CS Transmission Mount Insert | CS PMM | Forged Recirculate Valve | CS & JBR Silicone Hoses | Cobb AP | Koni FSDs | AutoTech HPFP Internals | CS TIP/SRI | CP-E TMIC | Hella SuperTones | CS Test Pipe | CS OCC | CS CF Hood Scoop | Stratified Flash Tune V2.10 - 2011 Black Mica Tech Package (15,500 miles) |
|
| |
| The Following User Says Thank You to JPele21 For This Useful Post: | RallySportDirect (01-12-2014) |
|
01-12-2014, 05:12 PM
| #12 | |
| Approved MSF Vendor Join Date: Dec 2008 Location: Draper, UTAH
Posts: 1,452
(View Stats)
iTrader: (6)
Rep Power: 637 Thanks: 435
Thanked 965 Times in 382 Posts
Groans: 0
Groaned at 3 Times in 3 Posts
(Thread Starter) | Not Ranked : 0 score
__________________ | |
|
| |
|
08-18-2014, 07:23 PM
| #13 | |
| Join Date: Aug 2014 Location: Florida
Posts: 1
(View Stats)
iTrader: (0)
Rep Power: 0 Thanks: 0
Thanked 0 Times in 0 Posts
Groans: 0
Groaned at 0 Times in 0 Posts
| Not Ranked : 0 score Hey MSF! I am a new member and this is my very first post/comment. Can you be more specific about the 3/16 gap between mount and chassis?  Is it best to use some gauge measuring tool? I see you just used a flat head screwdriver. Please explain. I just ordered the 80 duro Trilogy set and cant wait to have them installed! Is it best to use some gauge measuring tool? I see you just used a flat head screwdriver. Please explain. I just ordered the 80 duro Trilogy set and cant wait to have them installed! |
|
| |
|
08-18-2014, 08:17 PM
| #14 | |
| Join Date: Jan 2014 Location: Winnipeg, Manitoba
Posts: 295
(View Stats)
iTrader: (0)
Rep Power: 0 Thanks: 212
Thanked 224 Times in 90 Posts
Groans: 6
Groaned at 1 Time in 1 Post
| Not Ranked : 0 score Definitely using this guide when I get this and a TMM in a month or two. Great write up.
__________________ 2013 White MS3 Power |Cobb V3 AccessPort| |Ultimate Racing TBE w/ V2 DP| |Cobb FMIC| |Cobb SRI/TIP| |Autotech HPFP Internals| Supporting |Cobb RMM| |Cobb Shift Weight| |
|
| |
|
| Currently Active Users Viewing This Thread: 1 (0 members and 1 guests) | |
| |
 Similar Threads
 | ||||
| Thread | Thread Starter | Forum | Replies | Last Post |
| Passenger side motor mount cracked | bf360 | MazdaSpeed 3 - Engine, Transmission & Driveline | 20 | 10-27-2008 12:41 AM |


 Linear Mode


