
|
 |  |  |  |  |  |
 |
| |||||||

|
Welcome to Mazdaspeed Forums . You are currently viewing our boards as a guest which gives you limited access to view most discussions and access our other features. By joining our free community you will have access to post topics, communicate privately with other members (PM), respond to polls, upload content and access many other special features. Registration is fast, simple and absolutely free so please, join our community today! If you have any problems with the registration process or your account login, please contact contact us. *When you join MSF as a registered user, there will be No Ads. *Registered Members get access to the Off Topic Area of the Forum *Registered Members have an opportunity to upgrade their accounts to VIP, which brings a host of goddies for supporting MSF such as Raffles, Additional Forum Access, More PM Storage, The ability to upload more Images and many other enhancements. *Registered members also get access to the live chat box! |
 |
| | | LinkBack | Thread Tools | Search this Thread | Display Modes |
 |  08-20-2015, 07:17 PM
| #1 |  |
 Join Date: Mar 2014 Location: Decatur, GA
Posts: 387
(View Stats)
iTrader: (0)
Rep Power: 0   Thanks: 29
Thanked 176 Times in 115 Posts
Groans: 0
Groaned at 0 Times in 0 Posts
(Thread Starter) |   Not Ranked : 0 score Not Ranked : 0 score If you have a 2013 Speed3 with the technology package (which includes the touchscreen head unit), hereâs how to remove it. Itâs not hard, but itâs more involved than removing the regular Mazda3 radio. I hope the pictures help; photography is not my strong suit. 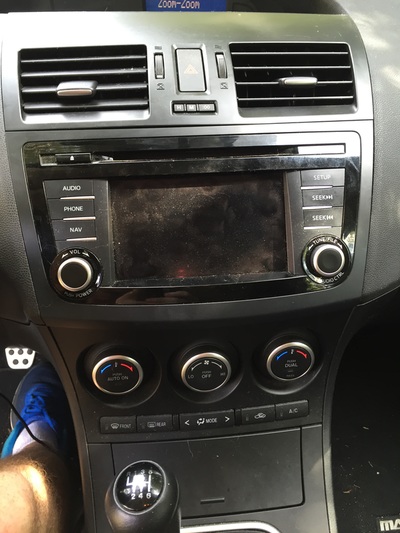 The only tool you need is a medium Phillips screwdriver. Step 1: Pull straight out on the vent panel above the radio. Donât pull on the vent grilles. Instead, grip the top edge with your fingernails and the bottom of one of the vents. It comes out pretty easy. Flip it up and either push it out of the way or remove the tweeter wiring harness to take it off completely. Remove the two screws holding the top of the radio in place. Do not attempt to remove the radio at this point. PLEASE NOTE: I took this picture when I was putting it back together; that's why the radio is pulled out. 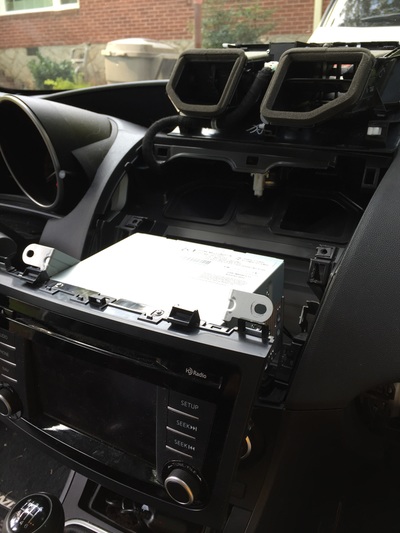 Step 2: Remove the passenger side scuff plate (not the one that says Mazdaspeed) by pulling it straight up. Step 3: Remove the passenger side lower trim piece by pulling out the one plastic fastener, pulling back the rubber seam, and popping it straight out. 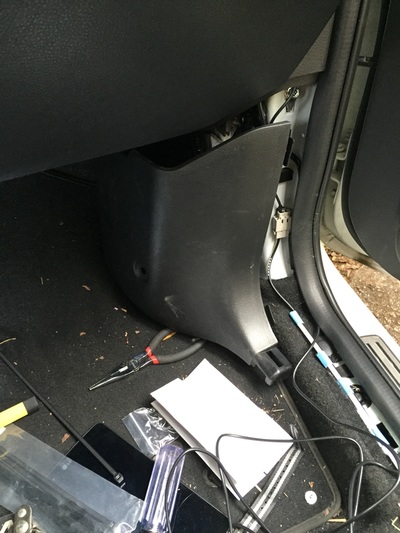 Step 4: Pull straight down on the dashboard undercover beneath the glove compartment. There are only two clips holding it on. 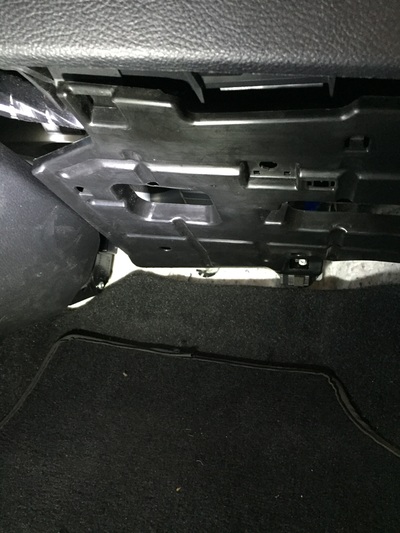 Step 5: Open the glove compartment. On the right side, you will see one guide (foreground) and just below it, the stay damper. Unclip the stay damper from the glove compartment door. Then, pull up on both the left and right guides so as you lower the glove compartment door, they will pull straight out. 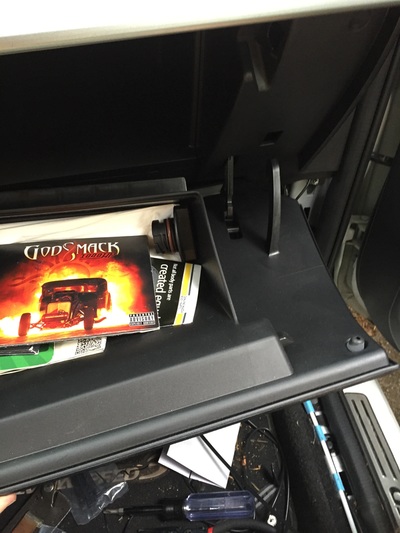 Step 6: Pull straight out on the passenger side lower left panel. It will just pop off. 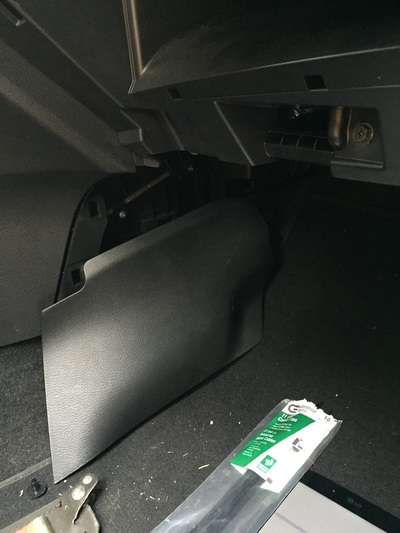 Step 7: Remove the glove compartment. Unscrew the upper and lower screws and pull straight out toward you. Remove the glove compartment light so you can set the whole assembly aside. 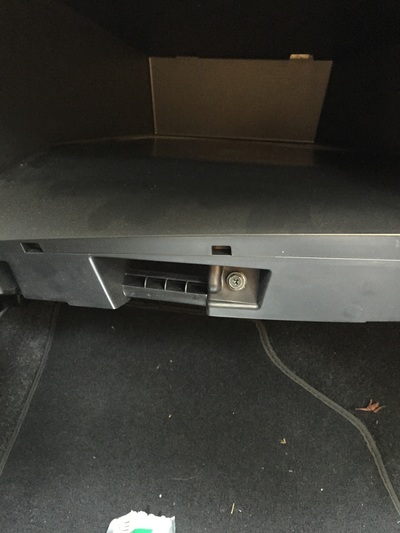 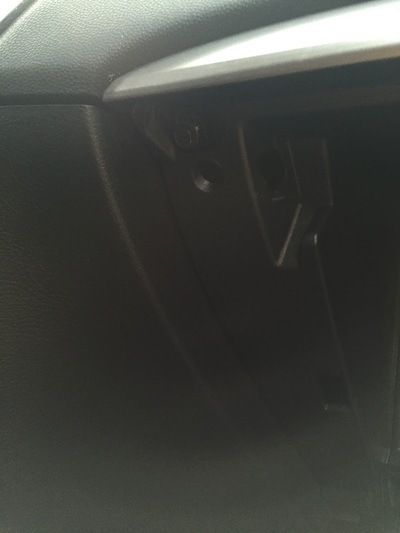 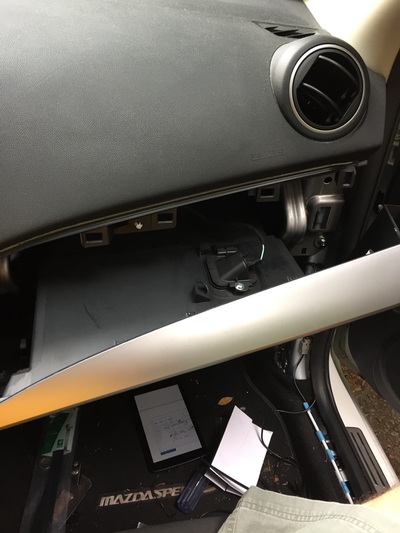 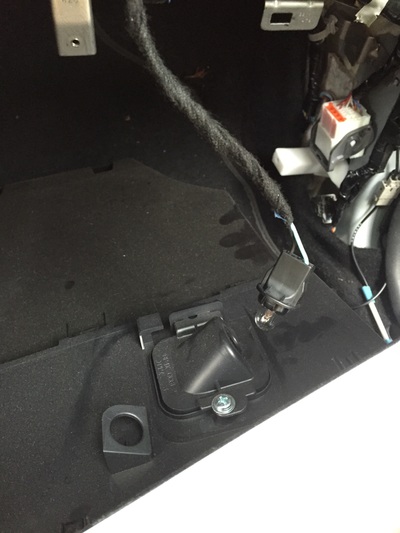 Step 8: Stick your head inside the gaping hole and look to your left. You will see two silver Phillips head screws connecting the radio to a bracket. Use a magnetized screwdriver to remove them. If they drop down, youâre going fishing. 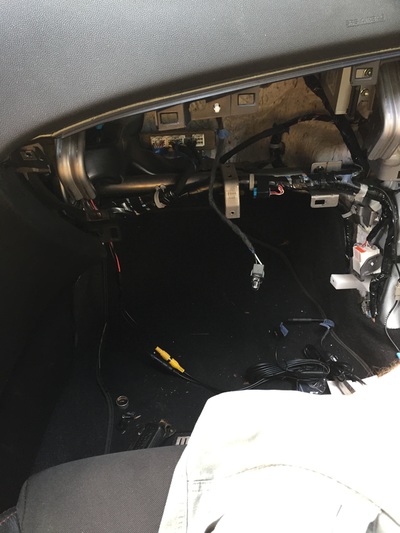 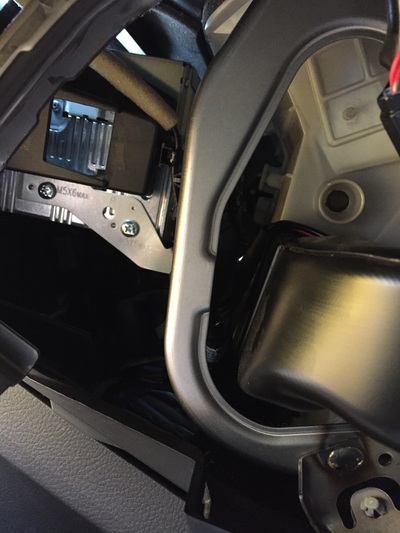 Step 9: In step 1, you removed the two screws at the top of the radio. Now that you have removed the bracket screws, youâre ready to pull the radio straight out toward you. Once you get it out far enough, you can remove the wiring harnesses and antenna. 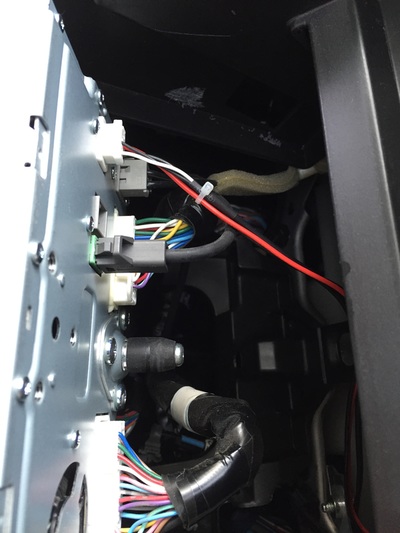 And that's it. Follow the instructions backward for reassembly/install. Please let me know if I need to make any edits. VaporOnly likes this. Last edited by ejb2112; 08-21-2015 at 06:54 AM. |

|  |
|
08-20-2015, 08:41 PM
| #2 | |
| Join Date: Mar 2015 Location: Norcross, GA
Posts: 694
(View Stats)
iTrader: (1)
Rep Power: 0 Thanks: 45
Thanked 158 Times in 117 Posts
Groans: 3
Groaned at 10 Times in 5 Posts
| Not Ranked : 0 score Damn that looks like a lot!!! |
|
| |
|
08-21-2015, 03:36 AM
| #3 | |
| Join Date: Mar 2014 Location: Decatur, GA
Posts: 387
(View Stats)
iTrader: (0)
Rep Power: 0 Thanks: 29
Thanked 176 Times in 115 Posts
Groans: 0
Groaned at 0 Times in 0 Posts
(Thread Starter) | Not Ranked : 0 score
Wait...I just saw your location and it says Decatur. Me too (city of). More than happy to get together with you and go through it if you want. | |
|
| |
| The Following User Says Thank You to ejb2112 For This Useful Post: | Dommo14 (08-21-2015) |
|
08-21-2015, 05:32 AM
| #4 | |
| Join Date: Oct 2013 Location: Fort Myers, FL
Posts: 2,127
(View Stats)
iTrader: (7)
Rep Power: 0 Thanks: 976
Thanked 2,167 Times in 964 Posts
Groans: 438
Groaned at 11 Times in 11 Posts
| Not Ranked : 0 score Only the 13's with a tech package came with this unit. 10-12 have the regular headunit. Pop off the vents, take out 2 screws, done. Seems they made it more of a pain to take this one out for some reason.
__________________ All good things must come to an end... |
|
| |
| The Following User Says Thank You to g00s3y For This Useful Post: | prosper0 (01-14-2016) |
|
08-21-2015, 06:20 AM
| #5 | |
| Join Date: Mar 2015 Location: Norcross, GA
Posts: 694
(View Stats)
iTrader: (1)
Rep Power: 0 Thanks: 45
Thanked 158 Times in 117 Posts
Groans: 3
Groaned at 10 Times in 5 Posts
| Not Ranked : 0 score
ejb2112 likes this. | |
|
| |
|
08-21-2015, 06:52 AM
| #6 | |
| Join Date: Mar 2014 Location: Decatur, GA
Posts: 387
(View Stats)
iTrader: (0)
Rep Power: 0 Thanks: 29
Thanked 176 Times in 115 Posts
Groans: 0
Groaned at 0 Times in 0 Posts
(Thread Starter) | Not Ranked : 0 score
| |
|
| |
|
08-21-2015, 07:13 AM
| #7 | |
| Tachyonic Moderator   Join Date: Nov 2013 Location: San Antonio, TX
Posts: 4,784
iTrader: (4)
Rep Power: 1969 Thanks: 5,076
Thanked 3,693 Times in 1,891 Posts
Groans: 283
Groaned at 20 Times in 16 Posts
| Very helpful since I have the 2013 model with Tech. Sent from my HTC M9
__________________ 2013 Crystal White Pearl Mazdaspeed 3 w/ Tech Package BNR S4, XSPower v3 Exhaust Manifold w/ Tial 44mm EWG Cobb accessport V3, Dizzy Tune in progress CP-e stage2 rmm, tmic, hpfp JBR boost tubes, Tru-3.5in Intake inside a Corksport Cold Air Box, Catless Downpipe & Racepipe, bypass hose, hood scoop, BPV, hood struts, stubby antenna, Aluminum Skid Plate, EBCS, 3.5BAR MAP Sensor, Magnaflow Catback Exhaust DM Full EGR Delete, Passenger Motor Mount, Transmission Motor Mount., Coolant Bypass, VTCS Delete, NGK ILTR6A-7G ,G-LOC R6 Brake pads and Centric High Carbon brake rotors Looks: 25% tint front, 5% back, Heat-blocking front windshield film Escort Passport Max360, RGBW Halos/Demon Eyes 20'' LED Light bar Use my Updated Custom Google Search to search this forum since the advanced search here is broken |
|
| |
|
11-08-2015, 06:42 AM
| #8 | |
| Join Date: Apr 2011 Location: Tampa, FL
Posts: 209
(View Stats)
iTrader: (0)
Rep Power: 0 Thanks: 88
Thanked 159 Times in 69 Posts
Groans: 0
Groaned at 0 Times in 0 Posts
| Not Ranked : 0 score
__________________ Engine | GTX3067R | Cobb AP | Autotech Internals | HTP 3.5" Intake | M2 Long Downpipe | | ATP FMIC | Forge V1 | Grimmspeed EBCS | 3 BAR MAP | NGK Iridium IX | | Damond EGR Delete | JBR OCC | E33 Self Tune | DO7 Meth | Handling | Damond RMM | Damond PMM | JBR 88a TMM | JBR Shift Weight & Knob | | JBR Rear Sway Bar | Cobb Springs | | |
|
| |
|
06-15-2017, 02:02 PM
| #9 | |
| Join Date: Feb 2016 Location: Deland Flroida
Posts: 61
(View Stats)
iTrader: (0)
Rep Power: 0 Thanks: 16
Thanked 5 Times in 3 Posts
Groans: 0
Groaned at 0 Times in 0 Posts
| Not Ranked : 0 score Thanks I am going to be installing the backup camera and this will be a great help! |
|
| |
|
| Currently Active Users Viewing This Thread: 1 (0 members and 1 guests) | |
| |
 Similar Threads
 | ||||
| Thread | Thread Starter | Forum | Replies | Last Post |
| How to remove the oem stereo head unit | GhostInTheDarkness | MazdaSpeed 3 - How-To's | 12 | 05-04-2017 01:36 PM |
| Aftermarket head unit in a 2013 with tech | NCspecV81 | 2010 MS3 - Car Audio & Electronics | 4 | 12-15-2014 10:52 AM |
| 2010 MS3 Non-Tech Touchscreen Head Unit | khopwood77 | 2010 MS3 - Car Audio & Electronics | 19 | 01-03-2011 09:35 PM |


 2Likes


 Linear Mode


